17 Nov 2023
Step-by-Step Guide: Installing LVT Click Flooring in Herringbone Pattern
Learn how to install LVT click flooring in a herringbone pattern with this step-by-step guide. Create a stunning and unique floor design in your home or office.

Understanding LVT Click Flooring
LVT (Luxury Vinyl Tile) click flooring is probably the most sort after product in the market in 2023. It offers the look and feel of real parquet but with the added benefits of durability and easy maintenance. LVT click flooring is made up of multiple layers, including a wear layer, a design layer, and a backing layer. The click system allows the planks to interlock securely, making installation a breeze.
Before installing LVT click flooring in a herringbone pattern, it’s important to understand the product and its features. LVT click flooring can be installed over various types of subfloors, including concrete, plywood, and existing flooring. It is resistant to moisture, making it suitable for areas prone to spills and high humidity. Additionally, LVT click flooring is available in a wide range of designs and colors, allowing you to achieve the desired aesthetic for your space.
By familiarizing yourself with LVT click flooring, you’ll be better equipped to choose the right product and ensure a successful installation.
Choosing the Right LVT Click Flooring for Herringbone Pattern
When selecting LVT click flooring for a herringbone pattern, it’s important to consider a few key factors. Opt for planks that are specifically designed for herringbone installation, as they are typically available in packs labeled as A and B. These A and B planks interlock together, creating the stunning herringbone pattern that is so desired.
Next, consider the colour and design of the LVT click flooring. Herringbone patterns can be created using various shades and styles, so choose a design that complements your space and personal taste. Additionally, ensure that the LVT click flooring has a wear layer that is suitable for the intended use and foot traffic of the area.
Lastly, be sure to consult the manufacturer’s guidelines and recommendations for installation. It’s important to note that certain types of LVT click flooring may require specific underlayment or adhesive. Additionally, some LVT click flooring comes with pre-attached underlayment, and adding extra underlay may void the manufacturer’s warranty. Therefore, it is crucial to carefully follow the instructions provided to ensure a proper and successful installation.
Preparing the Subfloor
Before installing LVT click flooring in a herringbone pattern, it’s important to prepare the subfloor properly. Start by cleaning the subfloor to remove any dirt, dust, or debris. Ensure that the subfloor is smooth and level, as any imperfections can affect the installation and appearance of the flooring.
If necessary, repair any cracks or uneven areas in the subfloor. This may involve filling in gaps with a suitable filler or resin and sanding down any high spots. Additionally, check for moisture issues and address them accordingly. Moisture can damage LVT click flooring, so it’s crucial to ensure a dry and stable subfloor.
Properly preparing the subfloor is absolutely crucial when it comes to any flooring installation. If you’re not confident in your abilities, it’s highly recommended to seek the advice of a professional fitter. Don’t underestimate the importance of a well-prepped subfloor – it can make a world of difference in the final result of your flooring project.
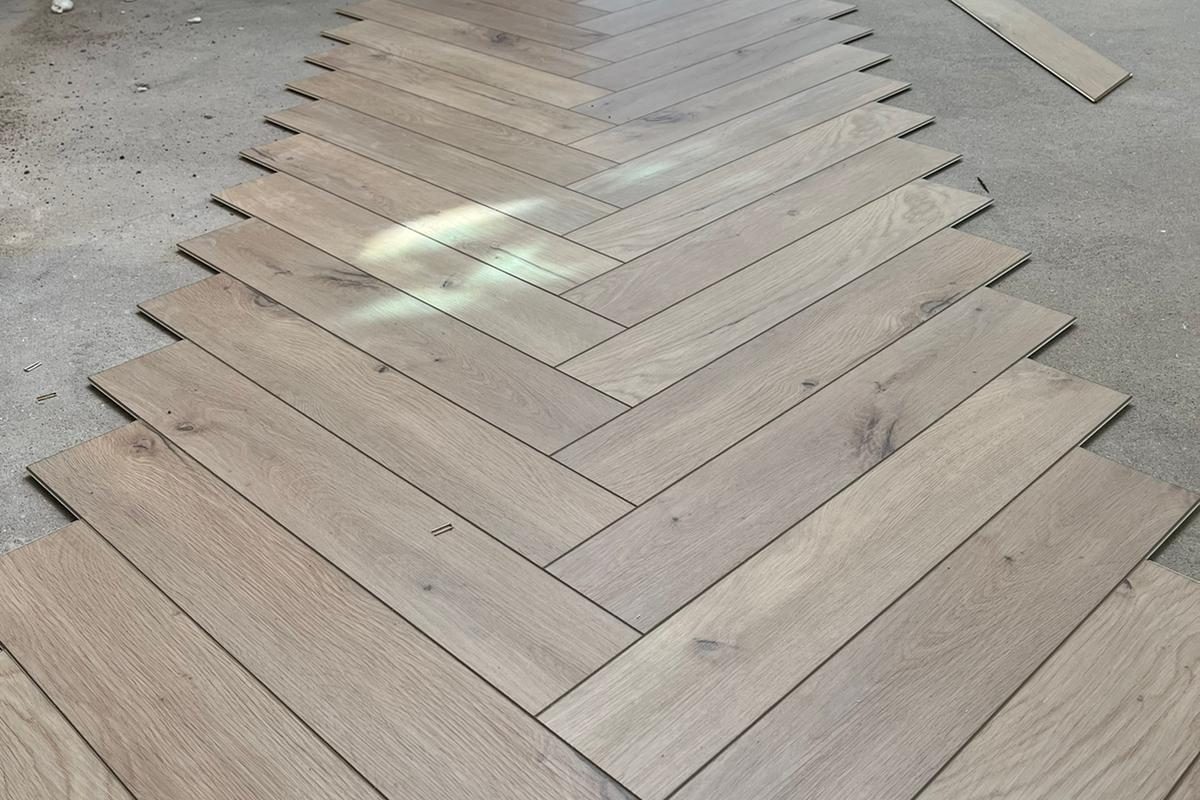
Installing LVT Click Flooring in Herringbone Pattern using A and B planks
Installing luxury vinyl click herringbone flooring can transform the look of a space, providing a timeless and elegant design. The A and B plank method, also known as the left and right method, is a popular approach to achieve the classic herringbone pattern. Follow this comprehensive guide for a successful installation:
Materials and Tools:
– Luxury vinyl click herringbone planks
– Tape measure
– Tapping block
– Rubber mallet
– Utility knife
– Spacers
– Pull bar
– T-square
– Saw (circular or miter saw)
– Pencil
– Safety gear (gloves, safety glasses)
Step 1: Preparation
Prepare the Subfloor: As we have mentioned above, Ensure that the subfloor is clean, dry, and level. If necessary, use a self-leveling compound to correct any uneven areas.
Step 2: Establishing a Center Line
1. Find the Room Centre: Measure and mark the centre of the room’s length and width.
2. Create a Perpendicular Line: Use a T-square to draw a perpendicular line from the center of the length to the center of the width. This creates a crosshair at the center of the room.
3. Snap a Chalk Line: Use a chalk line to snap a straight line through the center of the room, creating a reference line for your first row.
Step 3: Starting with Columns (A and B Plank Method)
1. Begin with Column A: Lay the first plank along the chalk line, with the tongue facing the center line. This is the start of Column A.
2. Add Column B Plank: Place the second plank (Column B) with the tongue facing the opposite direction, interlocking it with the first plank.
3. Continue with Columns A and B: Alternate between Column A and Column B planks as you work your way along the chalk line.
Step 4: Symmetry and Adjustment
1. Maintain Symmetry: Regularly check for symmetry by measuring the distance from the center line to the walls. Adjust the planks as needed to ensure a balanced herringbone pattern.
2. Trimming Planks: Use a trimming knife to trim planks as necessary, especially at the edges and corners.
Step 5: Completing the Installation
1. Continue Installation: Work row by row, interlocking the planks using the A and B method until the entire floor is covered.
2. Use Spacers: Insert spacers along the walls to allow for expansion.
3. Tapping and Securing Planks: Use a tapping block and rubber mallet to ensure a tight fit between planks. Secure any loose planks with a pull bar.
Step 6: The final bits for installation
1. Install Transition Strips: Install transition strips at doorways and entry points between different flooring types.
2. Remove Spacers: Once the installation is complete, remove the spacers and install baseboards or quarter-round molding to cover expansion gaps.
Tips and Considerations:
– Order Extra Planks: To account for waste, order 15-20% more planks than the measured square footage.
– Follow Manufacturer Guidelines: Always refer to the manufacturer’s installation guidelines for specific product recommendations and instructions.
By following these steps and considering the provided tips, you can achieve a professional and visually appealing luxury vinyl click herringbone floor using the A and B plank method.
Additional Finishing Touches and Maintenance Tips
After installing LVT click flooring in a herringbone pattern, there are a few finishing touches you can add to enhance the overall appearance. Install baseboards or quarter round molding to cover the expansion gap and provide a finished look. Use color-matched caulk or putty to fill any visible gaps or seams between the planks.
To maintain your LVT click flooring in a herringbone pattern, follow these tips:
– Regularly sweep or vacuum the floor to remove dirt and debris.
– Clean up spills and stains immediately using a damp cloth or mop.
– Avoid using abrasive cleaners or tools that can damage the flooring.
– Place felt pads under furniture legs to prevent scratches and dents.
– Use rugs or mats in high-traffic areas to protect the flooring.
By following these maintenance tips, you can keep your LVT click flooring looking beautiful and extend its lifespan.
 Chene Firmfit
 Classen
 Capital Creation
 LG Hausys
 Krono Swiss
 Columbus Flooring
 Krono Original Xonic